
When the sun shines on our skin, we get tan lines on those places covered by our clothes. When we don’t dust for a while, a critical finger can leave stripes through the build-up on our surfaces. But there are fun stripes in this world too: zebra stripes, for example! We think the ones in this unusual chocolate cake recipe are even more enticing.
Striped Square Cake with Chocolate Layers
Ingredients
- 7 eggs
- 9 oz sugar
- 3.5 oz corn starch
- 1 tsp vanilla extract
- 5 oz flour
- 9 oz butter
- 4 tbsp cocoa
- apricot jelly
- 7 fl oz whipping cream
- 7 oz dark chocolate
- 1 tbsp butter
Instructions
- Separate the eggs and beat the egg whites until they're stiff. Separately, beat the egg yolks and sugar with an electric whisk until they're fluffy. When the mixture has doubled in volume and has a sandy color, then it has the right consistency. Now add the corn starch, vanilla extract, and flour and work the ingredients in. Then add the butter and mix in the beaten egg whites.
- In the next step, divide the batter into two equal portions. Stir 2 tbsp cocoa into one portion.
- Spread out a portion of the light batter on a small baking tray lined with baking parchment. Bake it in a convection oven for three minutes at 390°F. Now spread out a layer of the chocolate batter and bake the cake again for another three minutes. Bake the cake again with each additional layer, but only very briefly.
- Once the cake is baked, cut off the edges to form a rectangle with straight sides. Make sure you cut all the edges precisely so they are really straight. This is particularly important for the next step. Now cut the cake lengthwise into eight strips of equal width. If you need to, place a ruler along the edge and mark the places where you need to make the cuts.
- Heat the apricot jelly to liquefy it, and apply it generously to the cake. Paint the top of every second strip and then turn them 90 degrees so they stick to the strips next to them. This will leave you with four double strips. Use the jelly to glue two of those together, to form the bottom layer of the cake. Cover the top of this layer with more jelly, then stick your two remaining double strips on as the top layer. Use plenty of jelly to make sure all the strips stick together and your cake holds its shape. Make sure you arrange your layers so the striped pattern alternates from square to square when you look at the cake from the end.
- To prepare the ganache, boil the whipping cream, take it off the heat and add the dark chocolate. You should use the time while the cream is heating up to chop the chocolate into fine pieces. Dissolve the chocolate in the cream and then add the butter. Place your striped cake on a cooling rack in a baking tray and let the ganache run down over it. Make sure you cover the cake completely and smooth the ganache flat with a scraper if necessary.
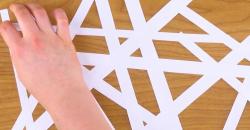
- For the last step, cut a sheet of letter paper into long strips of equal width. Stick the stripes together in a higgledy-piggledy lattice. Once the ganache (and the glue on the paper!) has dried, place your haphazard grid over the cake. Next, dust the cake generously with the leftover cocoa. Use more if you need to. Then remove the paper, leaving a geometric pattern.
VIDEO
After eating this cake you run the risk of finding stripes elsewhere… on your hands and face to start with. Or possibly around your middle if your waistband gets too tight. But if you can live with that, feast away! Or if you’re looking for more stripes and patterns to play with, you can find the instructions for the second recipe in the video, our Spiral Cake, here, or why not give our Apricot Bee Cakes a try?