You often spend more time than you’d like staring at the store windows of particularly talented pastry chefs: their creations look simply irresistible. And sometimes, they make such works of art, that you’re overwhelmed with admiration or envy, because you would love to make your own cakes and tarts look that good. The frosting is key to creating those particularly eye-catching looks.
The basic recipe for all these cakes is the same, likewise for the frosting. Below, you’ll find first a recipe for a delicious chocolate cake, then for the frosting and finally, a list of individual cake decorating ideas.
For the batter you’ll need (for 1 cake):
- 4 eggs
- 8¾ oz sugar
- 4⅓ oz flour
- 4⅓ oz cocoa powder
- 1 tsp baking powder
- 1 pinch salt
- 8¾ oz butter
Here’s how:
First beat the eggs and sugar together until they are foamy. Then add the rest of the ingredients and stir everything into a smooth batter.
Transfer the batter into a greased cake pan. Then bake the cake for about 20 minutes in a convection oven at 340°F and let it cool, before you start decorating.
For the frosting you’ll need (for 1 cake):
- 8¾ oz soft butter
- 8¾ oz icing sugar
- 10½ oz cream cheese
- food coloring in different colors
Here’s how:
First whip up the butter and gradually mix in the icing sugar, through a sieve. Then add the cream cheese in small amounts.
As soon as you have created a uniform cream, portion it out and color it according to the decoration variation of your choice.
1. Love Heart Cake
You’ll need:
- square cake pan
- round cake pan
- red food coloring
- fondant icing in yellow
Here’s how:
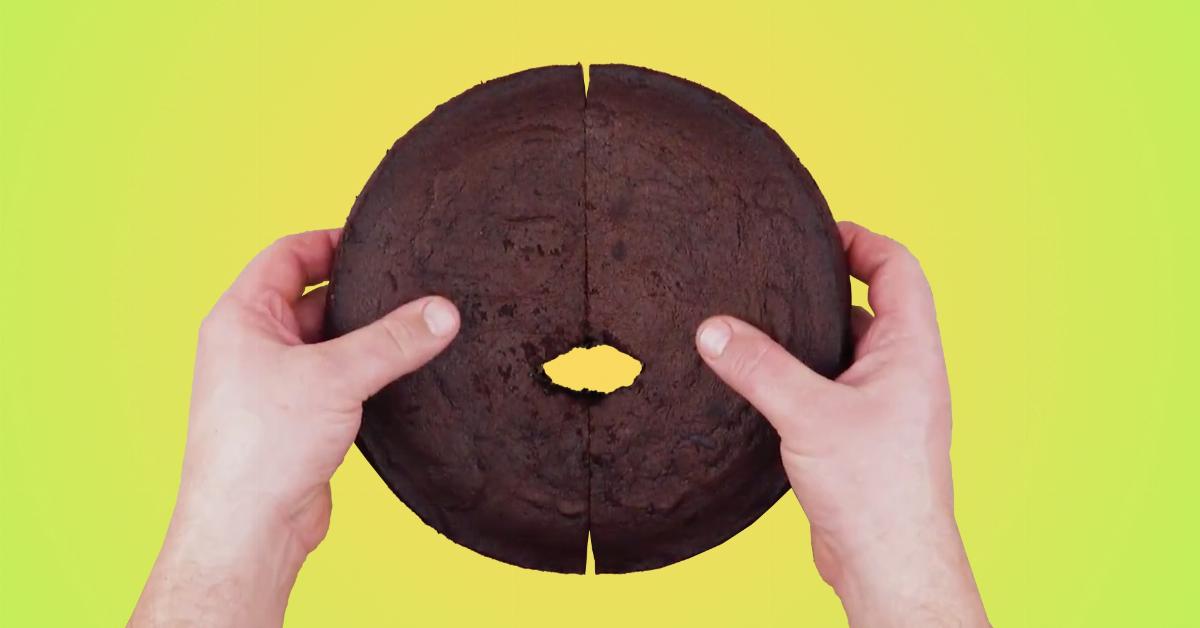
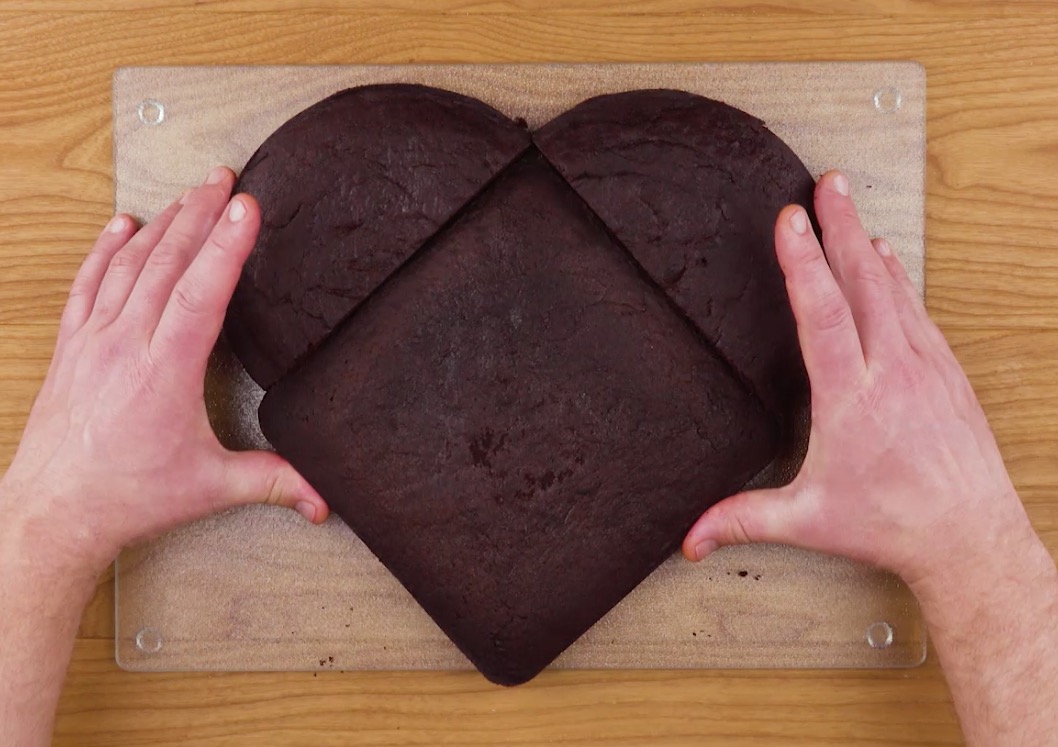
For this receip, you’ll need a round cake and a square cake. Cut the round cake in half and pull the halves apart to create a right angle. Slide the square cake into the gap, leading with one corner.
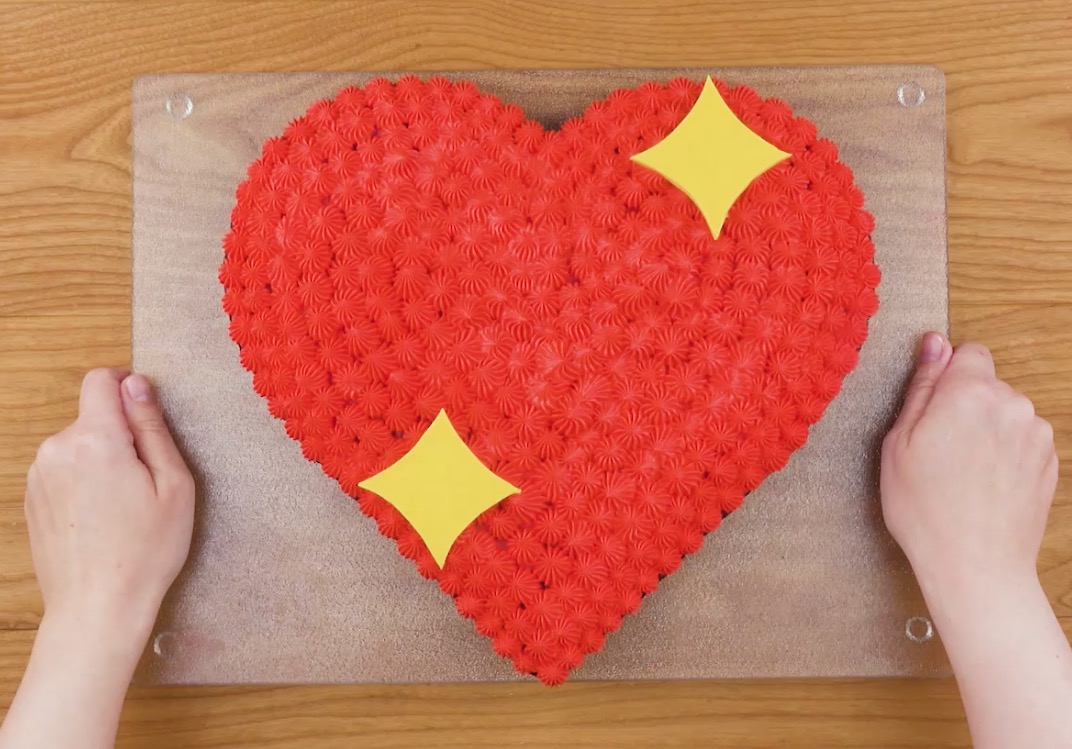
Put the red frosting in a piping bag and squeeze small blobs of frosting onto the heart-shaped cake. It’s best to work from the outside in.
Cut your two sparkle shapes out of the fondant icing and place them on top of the frosting. Your enchanting love token is complete!
2. Cuddly Bear Cake
You’ll need:
- small round cake tins
- round cake tin
- fondant icing in brown and white
- brown food coloring
- some liquid dark chocolate couverture
Here’s how:
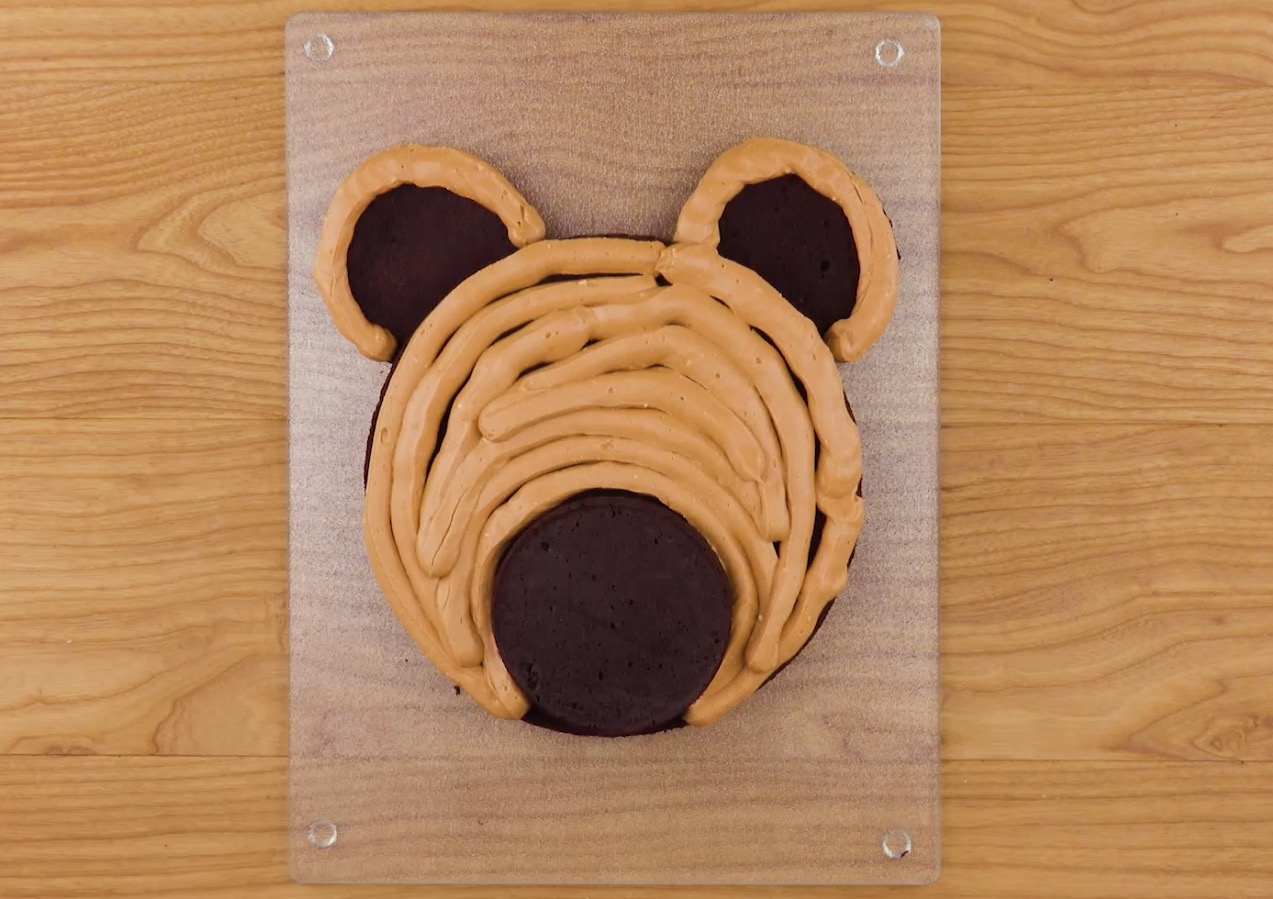
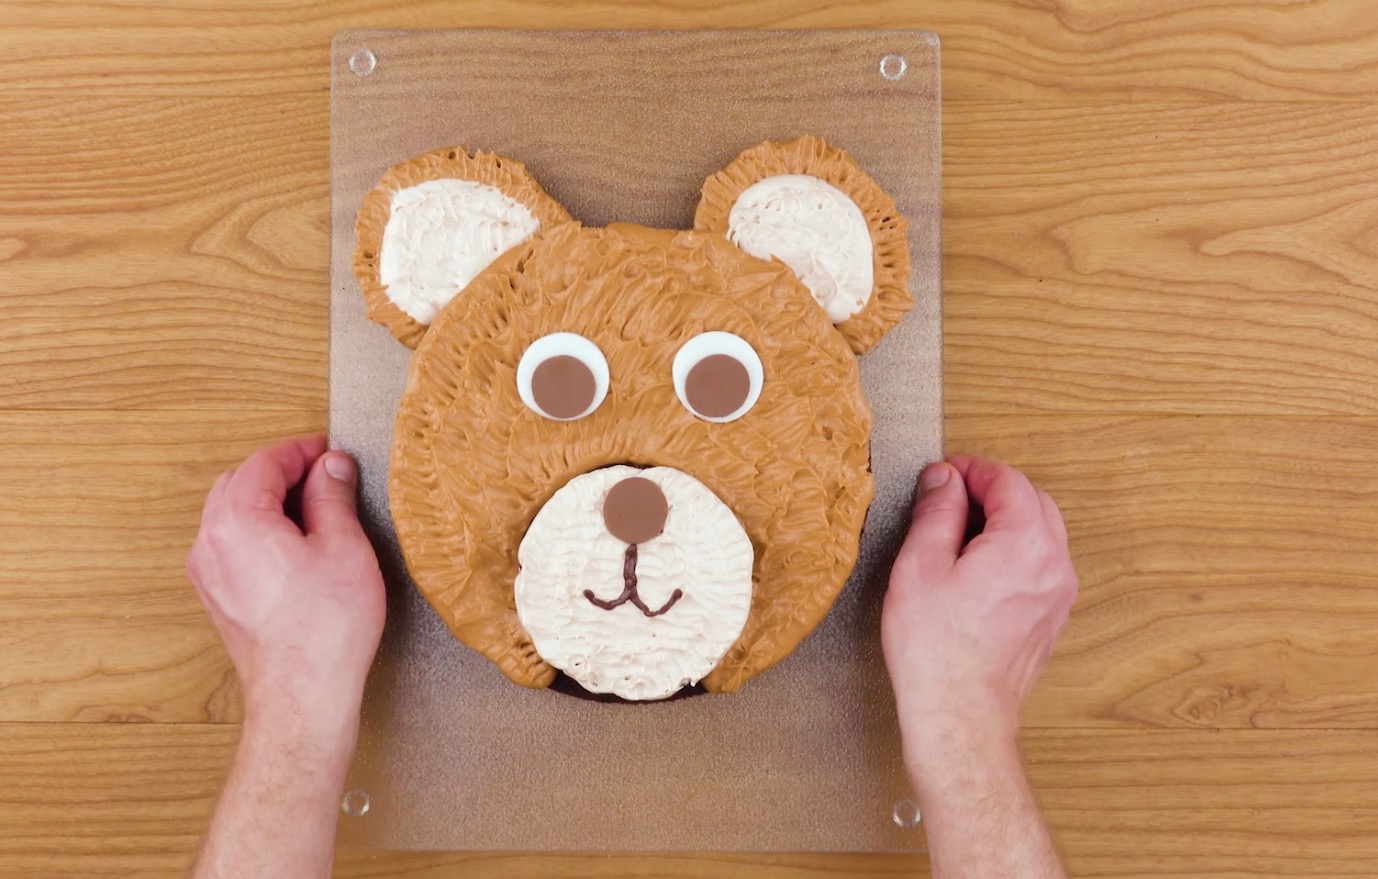
Make two small cakes and one large one. Cut an elliptical shape out of one of the smaller cakes, then cut the rest of the cake in half crossways. The two halves will form the bear’s ears. Set them next to the larger cake in the right place. Then put the second small cake on top of the big one in the middle of the bottom edge to form the bear’s snout.
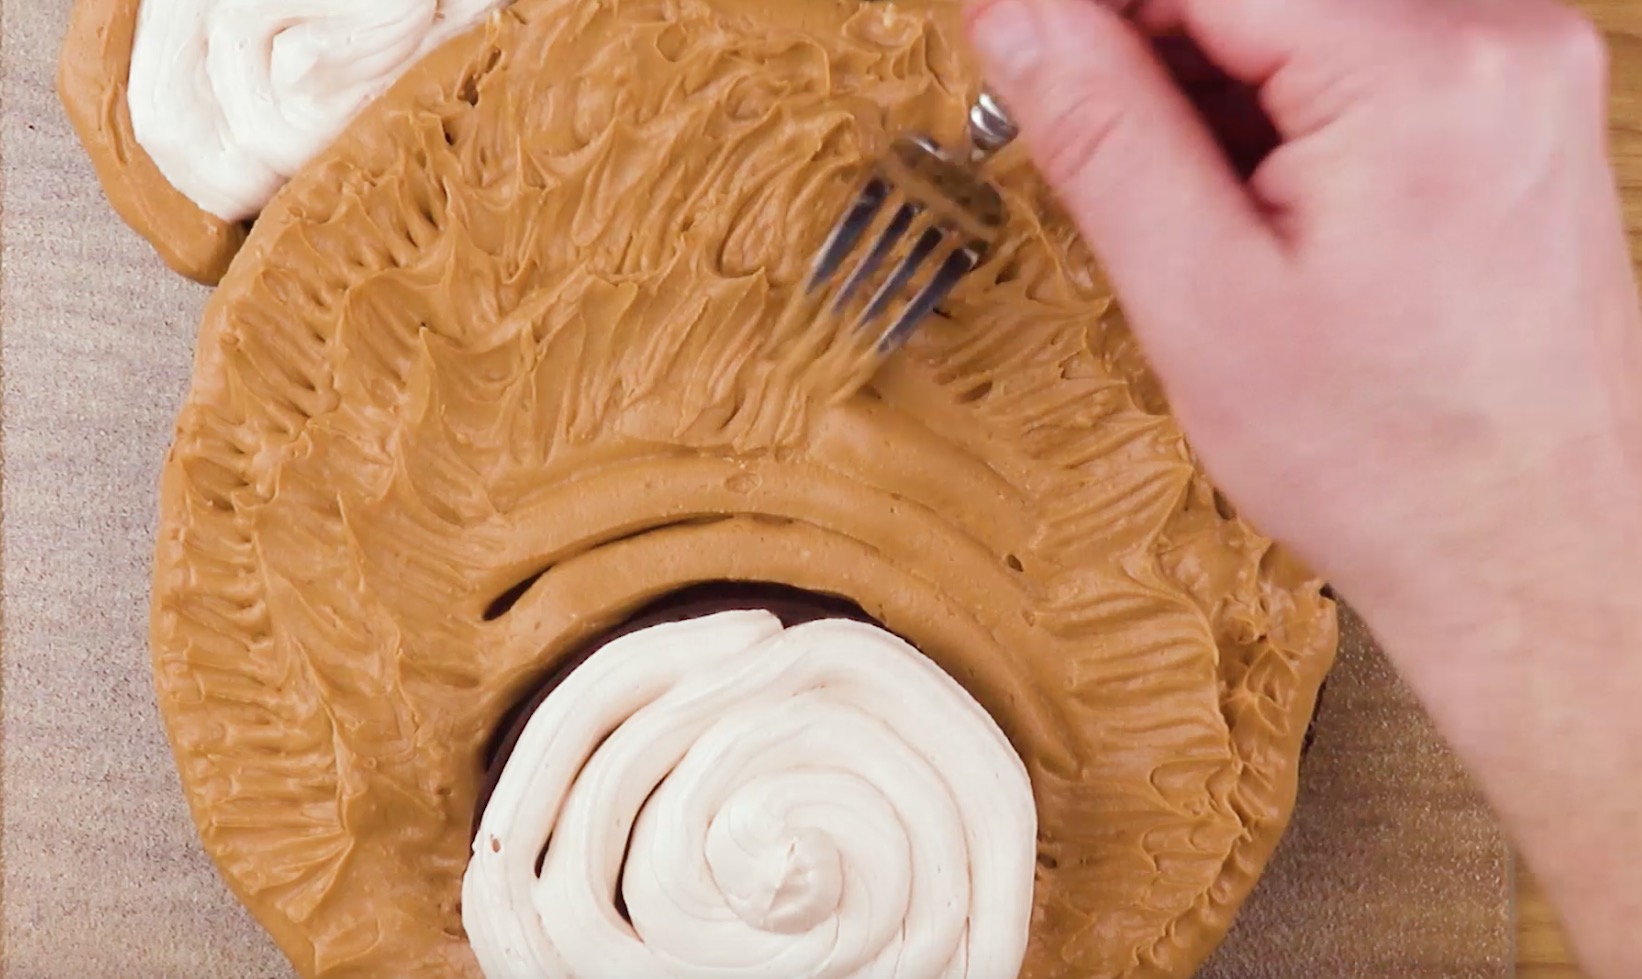
Then color about two thirds of the frosting with the brown food coloring and put it in a piping bag. Squeeze frosting around the edges of the ears and then apply it in strips over the whole of the large cake. Don’t cover the snout.
Now put the leftover, plain frosting in a piping bag and cover the empty spaces in the ears and the snout with it. Then rough up the surface of the frosting with a fork.
Next, for the eyes, cut out two circles of white fondant and two slightly smaller circles from the brown fondant and place them on top of each other on the bear’s face. Place a third brown circle on the snout.
Tip: Alternatively you can use chocolate chips or chocolate buttons of the the appropriate size.
Now put the couverture in a piping bag with a small nozzle and use it paint on the bear’s mouth.
3. Babyshower Cake
You’ll need:
- rectangular cake pan
- white fondant icing
- baby footprints silicon mold
- food coloring in turquoise and blue
Here’s hows:
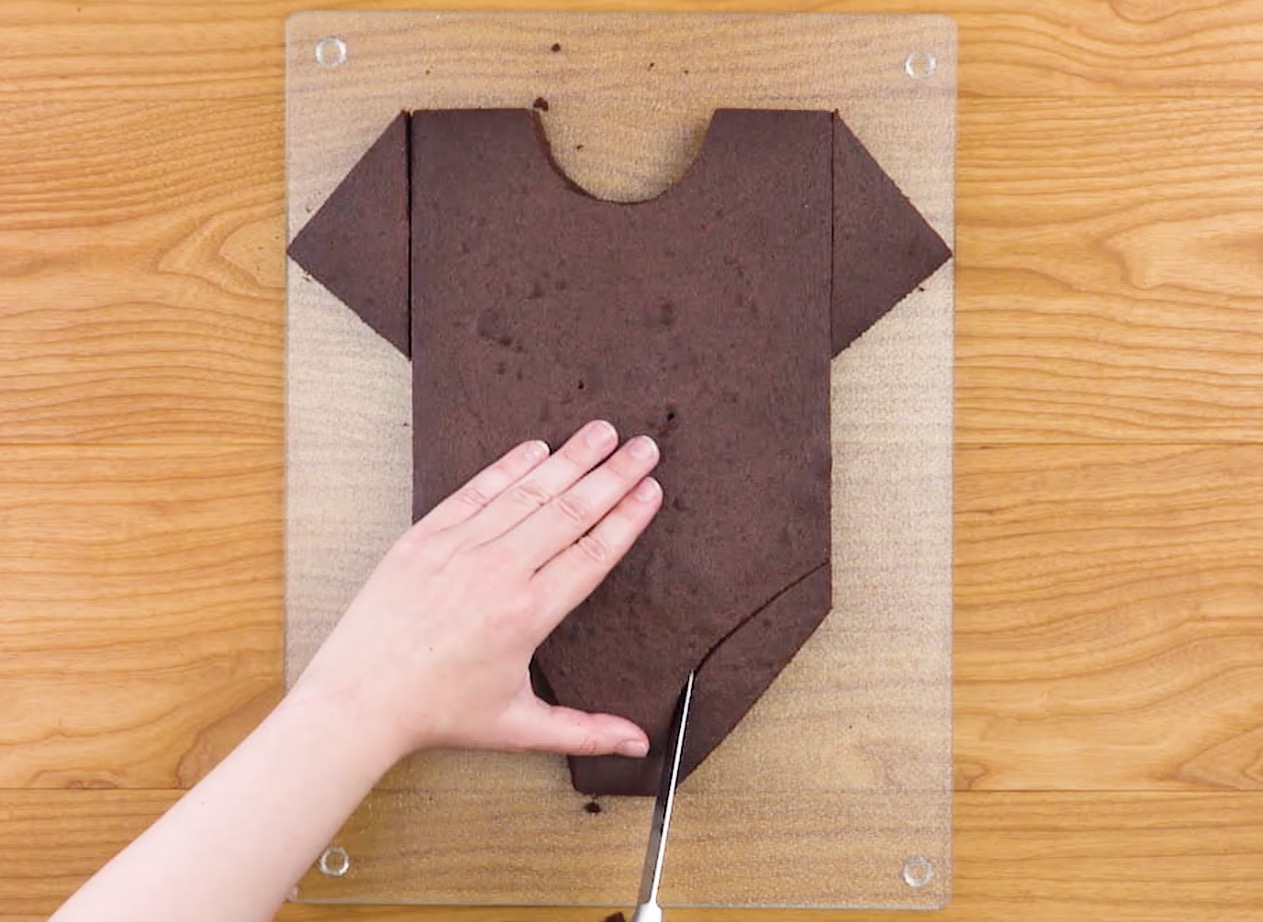
By the end, the cake should look like a romper suit: for this, first cut two corners from one of the short sides of the cake. Then place these triangles along the long sides at the other end of the cake.
Now cut the edges where you removed the two triangles so that they curve inwards. On the short side opposite, cut out a semicircle from the cake in the middle.
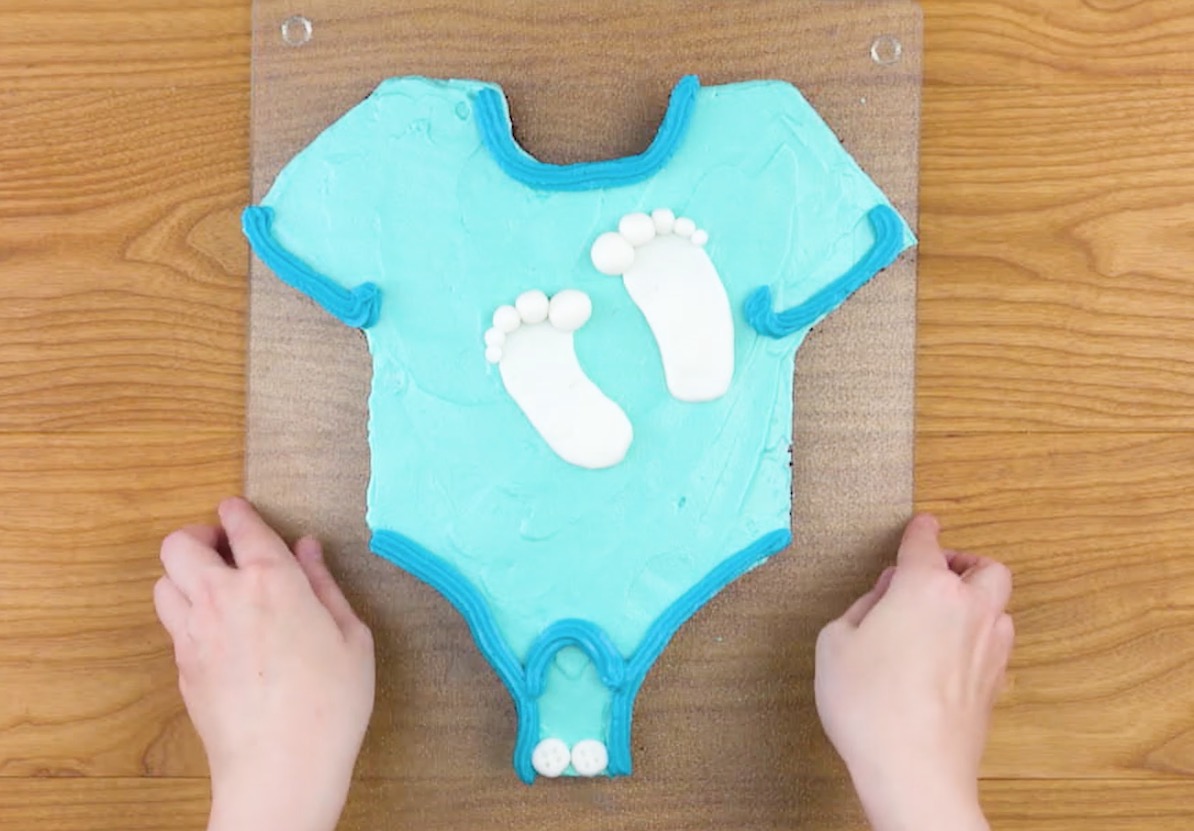
Color the majority of the frosting turquoise and use a piping bag to cover the entire cake. Then smooth it out with a spatula.
Then color the rest of the frosting blue and use a piping bag to apply it where the hems would be on an actual romper suit.
With the help of the silicon mold, create two baby feet from the fondant. Place them in the middle of the cake on top of the frosting. Next, make two buttons for the crotch, and put them in place.
4. Butterfly Cake
You’ll need:
- round cake pan
- food coloring in turquoise, violet, dark blue, brown and black
- fondant icing in black and violet
Here’s how:
Cut the cake in half, then cut a small triangle out of the flat edges of both halves, in the same place, a little more than halfway down.
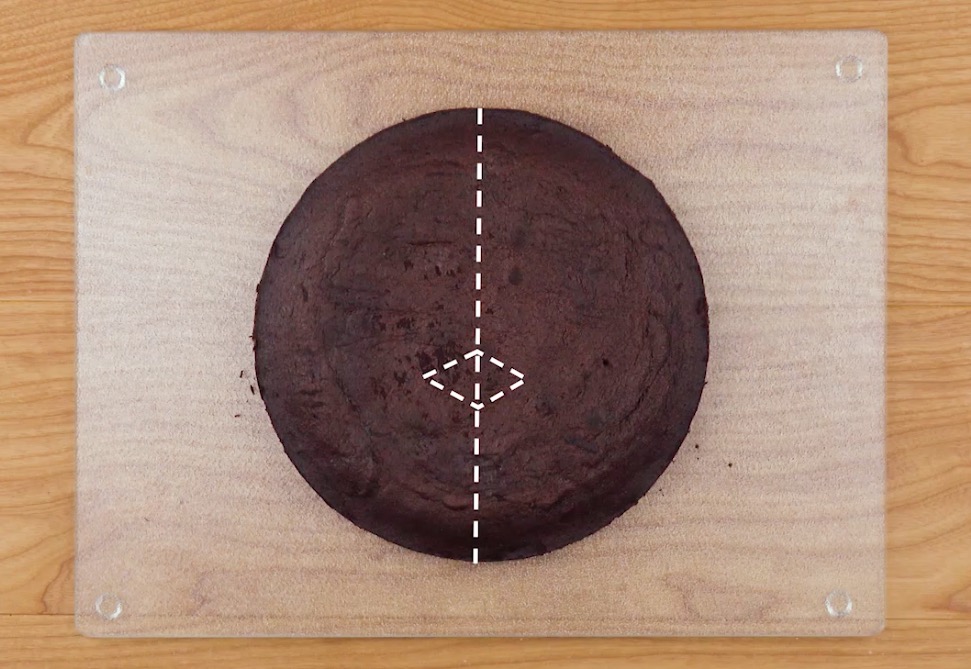
Swap the two halves over so the two curved edges are next to each other.
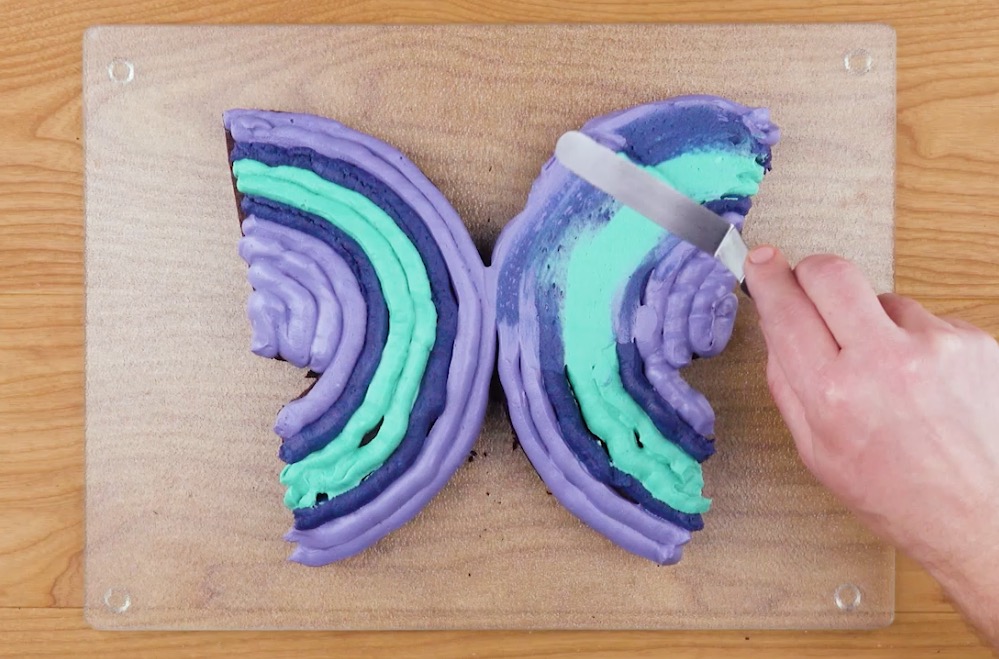
Divide the frosting into five portions and then color them with the colors listed above. The black portion should only be very small. Now use a piping bag to decorate the wings of your butterfly in long stripes in turquoise, violet and blue.
Smooth them all out with a spatula, following the curve of the lines. This creates a blurring effect.
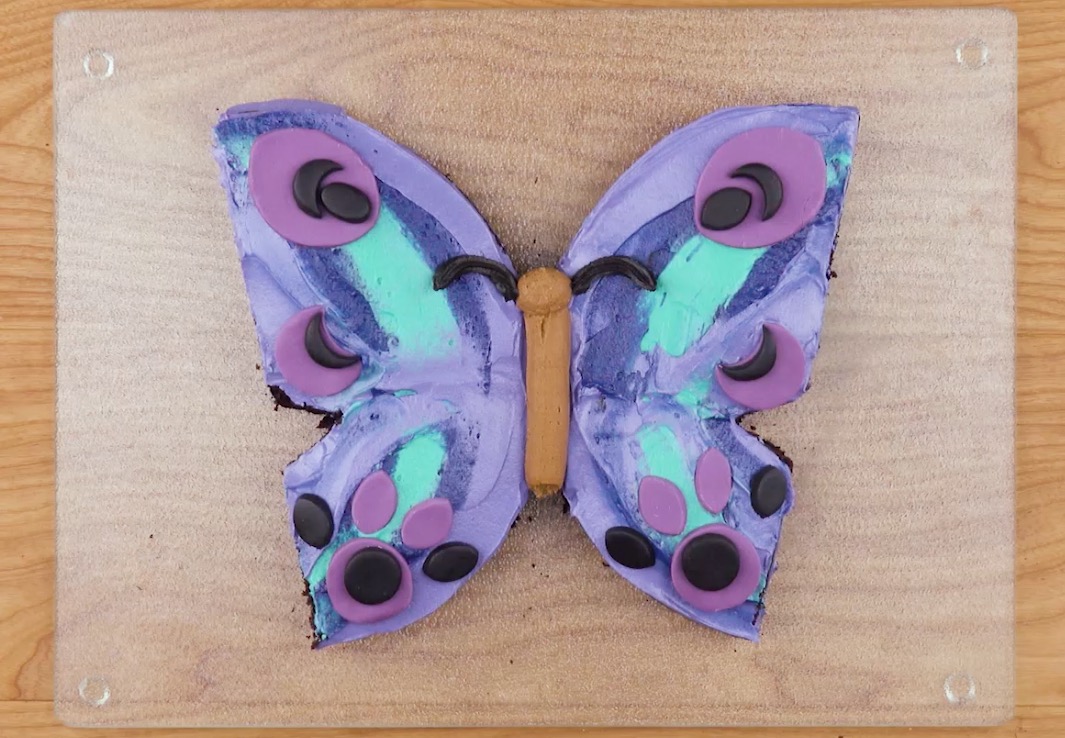
Then put the brown frosting in a piping bag and squeeze out a long strip between the wings for the body. Add a blob on top for the head.
Now put the black frosting in the piping bag and use it to draw the butterfly’s antennae.
Finally, you can decorate the wings with two colors of fondant. Cut out ellipses, circles and crescent moon shapes, combine them however you like, and arrange them in corresponding mirrored locations on both halves of the cake.
5. Unicorn Cake
You’ll need:
- rectangular cake pan
- food coloring in yellow, pink, violet, green and blue
- fondant icing in pink, white and black
Here’s how:
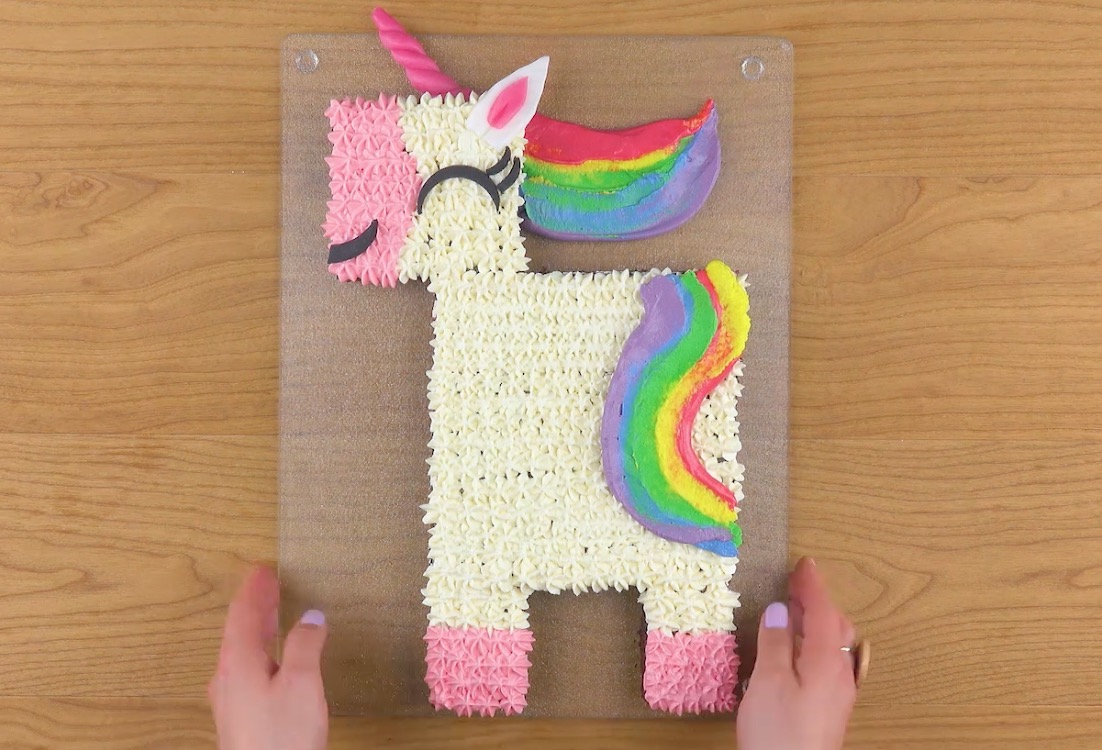
Place the cake in front of you, with one of the short sides pointing towards you. Cut away the top third of the cake. Then cut away a third of this segment, and cut that section into two halves.
Slide the largest part of the cake a little to the right as shown in the picture below. Arrange the two smallest pieces as unicorn hooves at the bottom two corners of the largest section. Now slide the medium-sized piece, which will form the head, a little to the left, so that it is only half-sitting on the largest piece.

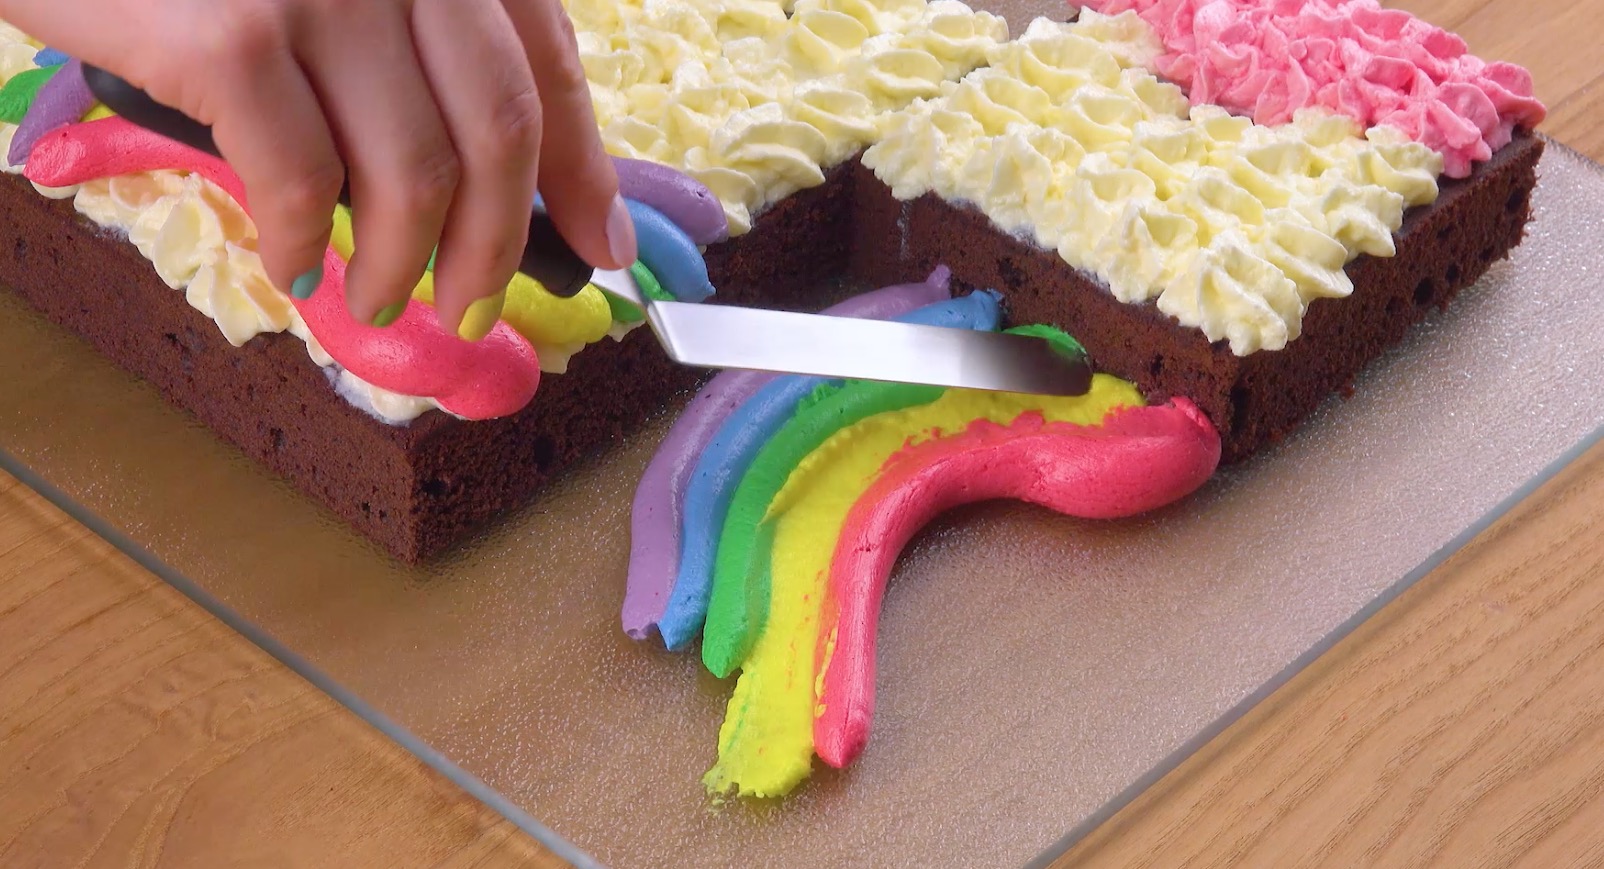
Color roughly two thirds of the frosting with some yellow food coloring, so that it becomes pale yellow. Use a piping bag with a serrated nozzle to squeeze it out over the cake in even blobs that sit close together. This color should be applied to the body and the back of the unicorn’s head. Work on the other areas in the same way using pink frosting. Color the frosting portion with a little pink food coloring.
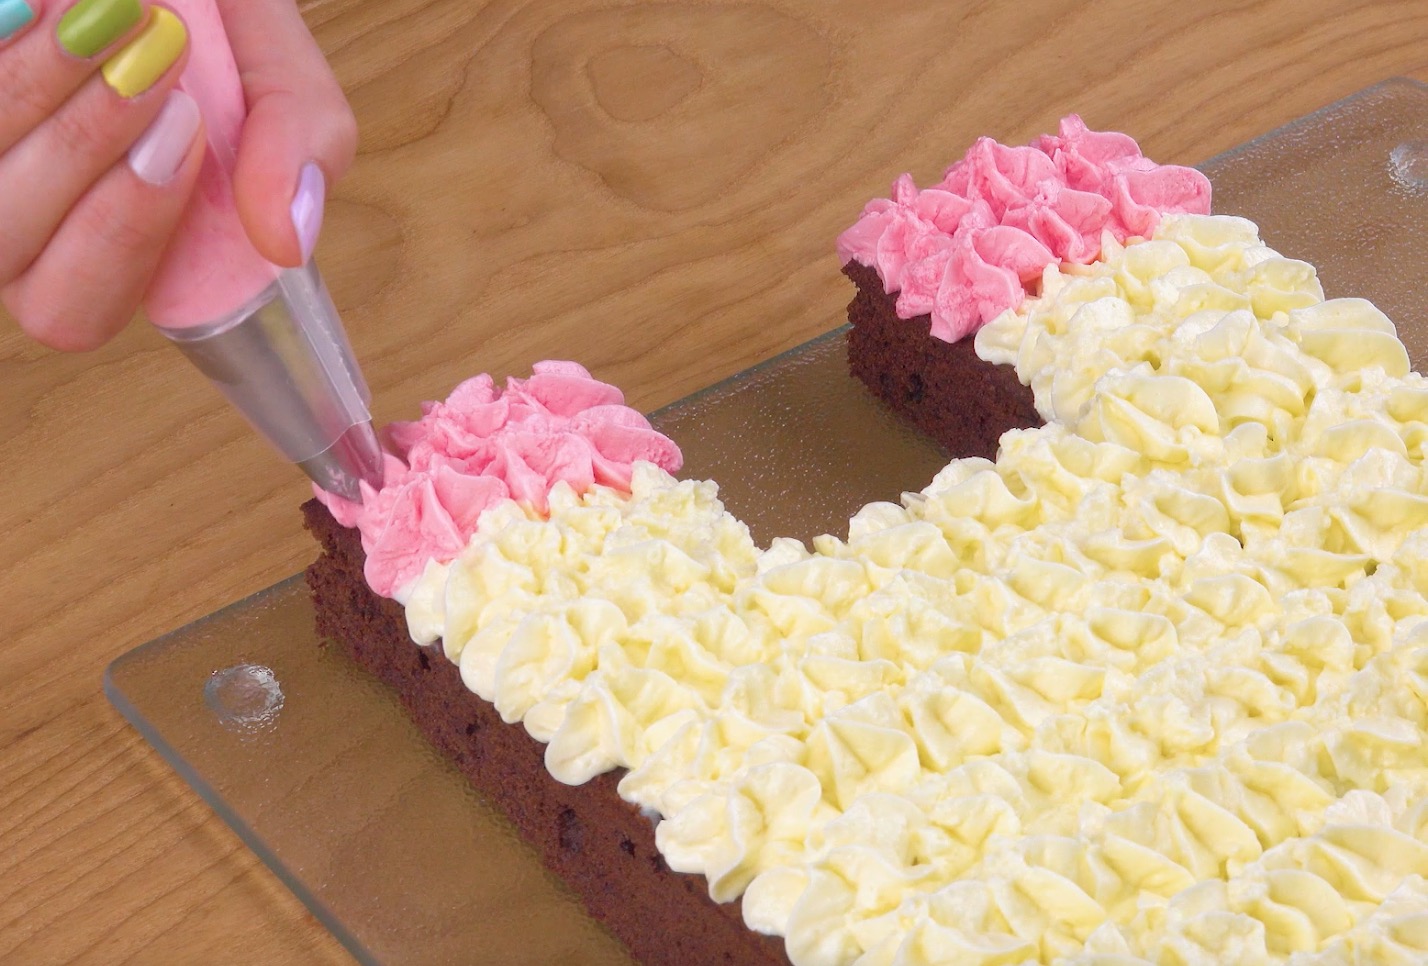
Now it’s time for the mane and tail: start by drawing a wavy line of pink frosting behind the unicorn’s head using the piping bag. Do the same from the upper right-hand corner of the body, creating a downward line. Next to both lines, create lines of yellow, green, blue and violet frosting in the same way. To finish, smooth over both sets of lines with a spatula.
Now you can refine things with the fondant: for this, twist two sticks of fondant together for the pink-colored horn. Then, fashion an ear in white and pink and then a mouth, and eye with eyelashes in the black.
So now you know what’s possible when you cut your cakes creatively and then work with the piping bag. And as long as the results are tasty enough and bright enough, your creativity will win you a lot of new fans!