When you go to a fancy restaurant, you can expect your food to be served in an impressive, elegant way – especially your dessert. Getting served a stunning work of food art makes the meal feel special, but it also ends up costing a fortune. But believe it or not, you can also make beautiful accents for your desserts yourself, right at home. These 4 creative ideas for decorating your cakes and desserts will help you transform your desserts into professional masterpieces! Plus, each one uses chocolate at its base, making your desserts even more delicious than they were before. Try them out for your next special occasion and leave all of your guests speechless!
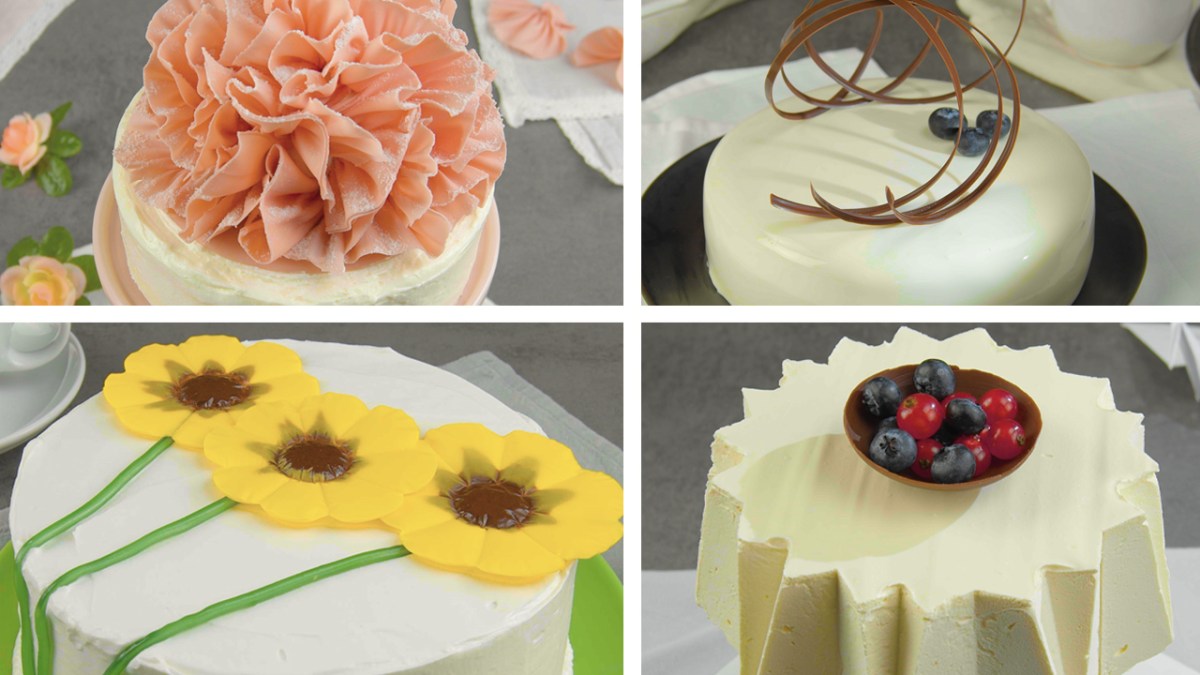
1. White Chocolate Carnation
Prep Time: 1 hour
Inactive Time: 15 minutes
Difficulty Level: Advanced
You’ll Need:
For the white chocolate carnation:
- 11 oz tempered white chocolate + pink food coloring
- 3 tbsp heavy cream, whipped
- powdered sugar
Extra:
- granite cutting board or similar
- long spatula
- wide spatula
- parchment paper
- piping bag
Here’s How:
1.1 Pour the tempered pink chocolate onto the granite cutting board or a similar surface, then spread a thin layer of it over the surface using the long spatula. Let the tempered pink chocolate set briefly, but don’t let it harden.

1.2 Use the wide spatula to create the pedals of the carnation by pushing strips of the pink chocolate upwards very quickly, holding each piece of chocolate together with your thumb and forefinger as you slide the spatula upwards, making the chocolate curl up and come to a point. Transfer the white chocolate pedals to the refrigerator and let them chill briefly.

1.3 Pour some of the tempered pink chocolate in a circle on a piece of parchment paper, transfer it to the refrigerator, and let it chill until it has hardened. Once the pink chocolate circle and pedals have chilled, whip the heavy cream, then pipe it onto the circular piece of pink chocolate. Insert the pink chocolate pedals into the whipped cream to form the carnation.

1.4 Sift some powdered sugar through a fine sieve on top of the white chocolate carnation and place your gorgeous new decoration on top of a frosted cake!

2. Chocolate Spirals
Prep Time: 20–30 minutes
Inactive Time: 15 minutes
Difficulty Level: Advanced
You’ll Need:
For the dark chocolate spirals:
- 7 oz dark chocolate, tempered
Extra:
- 14 x 4-inch cake collar
- stainless steel cake scraper
- 11-inch cylinder vase
- long spatula
Here’s How:
2.1 Cut the cake collar so that it’s 14 x 4 inches in size and temper the dark chocolate. Pour the tempered dark chocolate onto the cake collar and use the long spatula to spread around so it becomes 1 thin, even layer.

2.2 Use the cake scraper to make 1 set of long lines in the layer of dark chocolate.

2.3 Let the chocolate set briefly, then twist the cake collar into a spiral shape and insert it into the cylindrical vase.

2.4 Let the dark chocolate set at room temperature, then transfer it to the refrigerator to harden. Once the chocolate has hardened, take it out of the refrigerator and carefully remove the cake collar.

2.5 Place the dark chocolate spirals on top of cakes or other desserts to add a delicate, elegant accent.

3. Chocolate Black-Eyed Susans
Prep Time: 20–30 minutes
Inactive Time: 15 minutes
Difficulty Level: Advanced
You’ll Need:
For the chocolate black-eyed Susans:
- 2 oz dark chocolate, tempered
- 7 oz tempered white chocolate + yellow food coloring
- green candy rope
Extra:
- apple corer
- plastic wrap
- parchment paper
- cutting board
Here’s How:
3.1 Temper the white chocolate and stir in some yellow food coloring, then temper the dark chocolate. Line a cutting board with parchment paper, then spoon a circle about 2 inches in diameter of tempered yellow chocolate into the center. Spoon a circle of tempered dark chocolate about ½ inch in diameter into the center of the yellow chocolate.

3.2 Cover the chocolate with plastic wrap and carefully place the apple corer on top, lining up the center with the circle of dark chocolate. Gently press down on the apple corer to make the shape of a flower.

3.3 Remove the apple corer and repeat this process 2 more times to make 3 chocolate black-eyed Susans in total, then transfer them to the refrigerator and let them harden. Once the chocolate flowers are ready, take them out of the refrigerator and remove the plastic wrap. Place the flowers on a frosted cake and position some green candy ropes on the cake to make the flower stems.

4. White Chocolate Platform
Prep Time: 1 hour
Inactive Time: 1 hour
Difficulty Level: Advanced
You’ll Need:
For the white chocolate platform:
- 5 oz white chocolate, chopped
- ⅓ cup heavy cream
- 1¼ sticks butter, whipped at room temperature
- 4 oz dark chocolate, tempered
- mixed berries
- 4 chocolate hazelnut wafer rolls
Extra:
- 14 x 5 inch piece of card stock
- small soup ladle
Here’s How:
4.1 Place the small soup ladle in the freezer. To make the mold, fold the card stock in half lengthwise and cut along the fold. Fold the 2 strips of card stock so that they make a zig-zag shape, then tape the 2 pieces of card stock together to make 1 long, folded piece of card stock.

4.2 For the white chocolate cream, bring the heavy cream to a boil, then pour it over the chopped white chocolate. Stir everything together, then let the mixture cool down to room temperature. Whip the butter at room temperature, then add it to the white chocolate mixture and stir until combined. Evenly spread the white chocolate cream over the folded card stock, transfer it to the refrigerator, and let it chill for 20 minutes.

4.3 Place the set white chocolate cream along with the card stock mold around a small cake that’s about 4 inches in diameter and 2 inches tall, and press it firmly against the cake. Transfer the cake to the refrigerator and let it chill for 30 minutes.

4.4 Temper the dark chocolate and dip 1 end of each of the 4 wafer rolls in it. Place the wafer rolls upright on the tempered dark chocolate so that they make the 4 corners of a square on a plate or granite cutting board. Let the dark chocolate set briefly, then transfer the wafer rolls to the refrigerator to harden. Once the wafer rolls are ready, place them upright on a serving plate, carefully place the cake on top and remove the card stock mold.

4.5 Remove the soup ladle from the freezer and dip it into the tempered dark chocolate. Let the chocolate set briefly, then carefully remove the ladle. Place the small chocolate bowl on the white chocolate platform and fill it with fresh berries to serve.

These gorgeous ideas for professional-looking chocolate accents for your cakes and desserts will take your baking game to the next level. These stunning decorations are sure to impress whoever you serve them to!
Get the recipe for the Fantastic Chocolate Tricks featured in the bonus video.